Table of Contents

The purpose of this tutorial is to provide an overview of git branching.
If you are working on a larger project with a complex codebase, this method will provide you with a general understanding of how to contribute, but will not be entirely sufficient. Some repositories will utilize 5+ different branches to develop software including branches for features, hotfixes, a main development branch, release branches, and even Git submodules within the project. We do not have the time or reason to get that complex, and therefore the method I will show you includes a workflow with only 3 branches. You can see it below, but I suggest opening it and printing it out for reference.
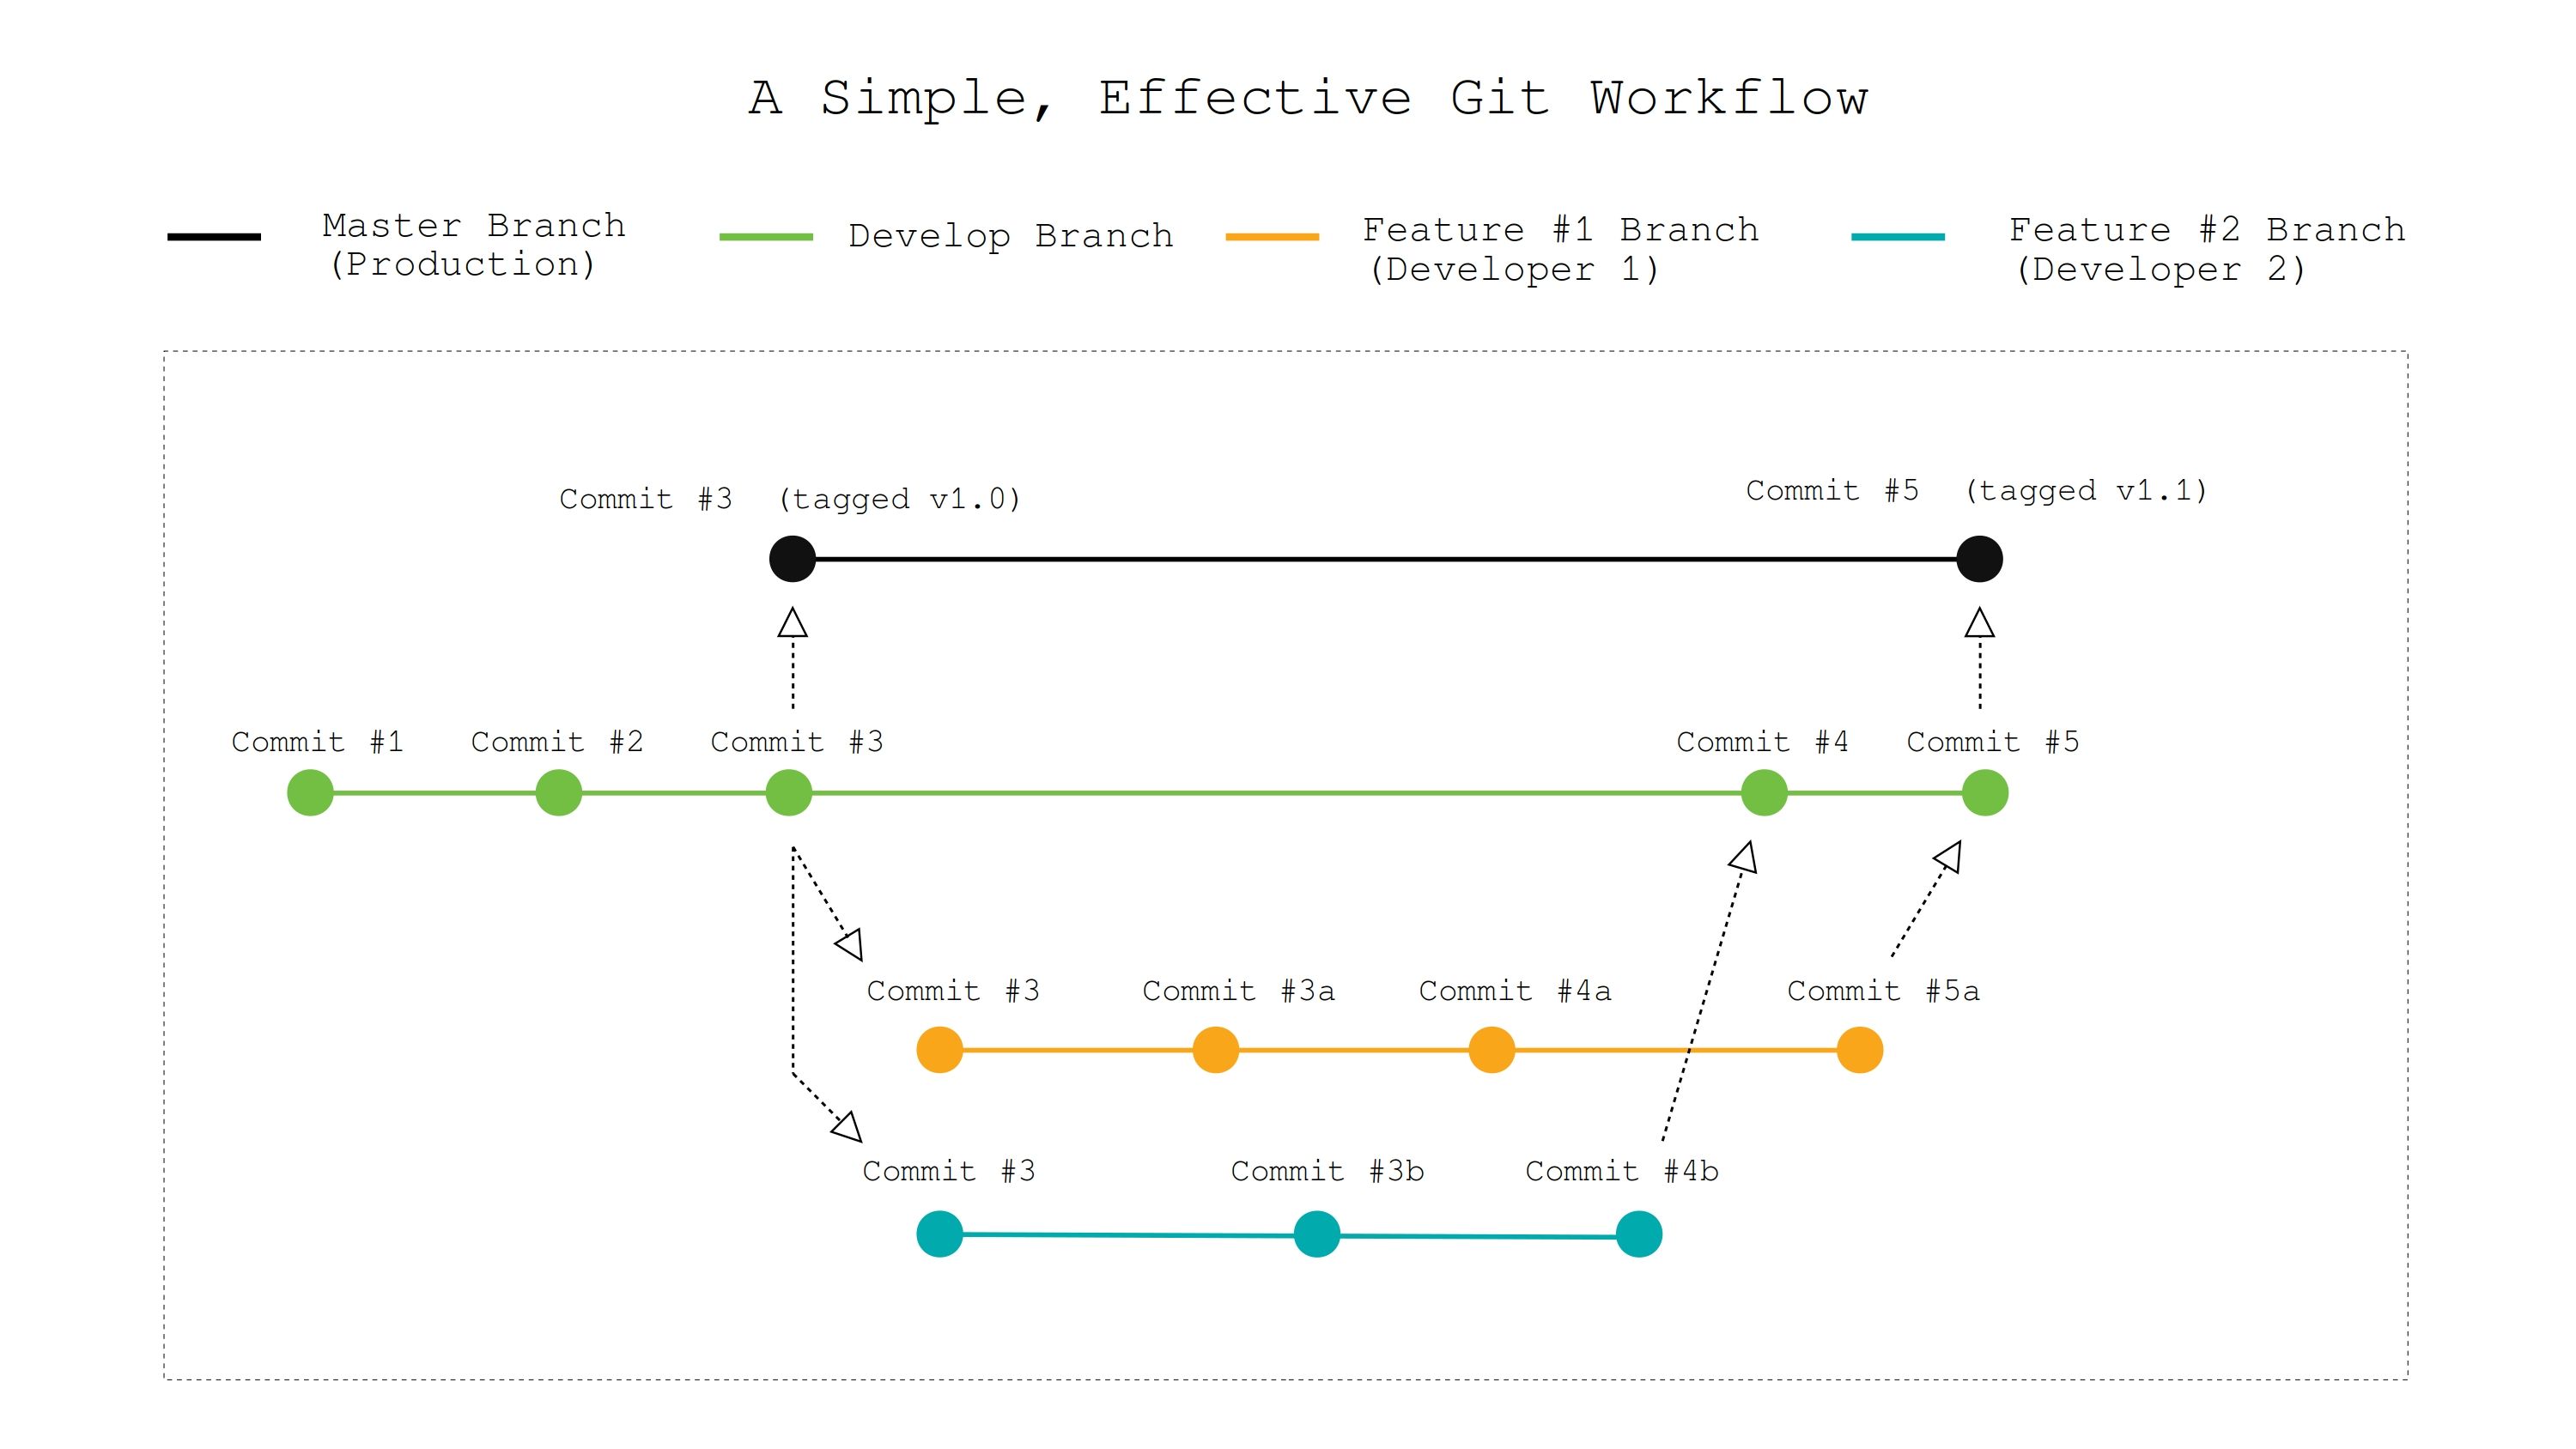
In this workflow, we have three branches:
- Master - This branch will have production code only. In other words, anything you push to the master branch better be free of bugs.
- Develop - This branch will be the "live" version of your software. If you are working on a team, this is the branch that developers will push to on a regular basis with new features.
- Feature - This technically is not a single branch because there can be tens, or even hundreds of outstanding feature branches at a given moment depending on the team size. Each feature branch represents a new chunk of code that will eventually be tested and added to the codebase.
The basic steps in this flow are as follows:
- Create a new branch from the develop branch and call it something like
feature-<describe feature here, or give it an ID>. - Work on your feature, committing to this feature branch
- Test your feature
- Merge your feature into the develop branch
- Delete your feature branch
- Once enough features have been added, prepare your release
- When the release is tested and prepped, merge the develop branch into master
- Tag the master branch commit to the correct version (i.e. v1.1)
- Repeat
This will make more sense if we actually go through the steps of creating a repository, writing some "production" code (it will be far from it, but for the purpose of the example it will work), and releasing that code. Along the way, you will learn the following topics:
- Creating branches
- Switching between branches
- Merging two branches
- Understanding upstream vs. downstream
- Tagging commits (for releases on master branch)
Setting up the Repo
Let's first setup a new repo, add some files, commit the files, and push them "upstream" to our remote repo. If anything here gets confusing, go back and the basics section of this post.
git init
git remote add origin [email protected]:zachgoll/basic-git-workflow.git

touch index.html
echo "<html><head><title>Simple Webpage</title></head><body><h1>Hello World</h1></body></html>" > index.html

touch README.md
echo "This repository will show you a basic git workflow for individuals or small teams" > README.md

git add index.html README.md

git commit -m "First commit"

git push origin master
Let's now add a License to this repository. I will add an MIT license, which is common for open source projects.
touch LICENSE
Copy the following text into LICENSE.
Copyright 2019 Zach Gollwitzer

Permission is hereby granted, free of charge, to any person obtaining a copy of this software and associated documentation files (the "Software"), to deal in the Software without restriction, including without limitation the rights to use, copy, modify, merge, publish, distribute, sublicense, and/or sell copies of the Software, and to permit persons to whom the Software is furnished to do so, subject to the following conditions:

The above copyright notice and this permission notice shall be included in all copies or substantial portions of the Software.

THE SOFTWARE IS PROVIDED "AS IS", WITHOUT WARRANTY OF ANY KIND, EXPRESS OR IMPLIED, INCLUDING BUT NOT LIMITED TO THE WARRANTIES OF MERCHANTABILITY, FITNESS FOR A PARTICULAR PURPOSE AND NONINFRINGEMENT. IN NO EVENT SHALL THE AUTHORS OR COPYRIGHT HOLDERS BE LIABLE FOR ANY CLAIM, DAMAGES OR OTHER LIABILITY, WHETHER IN AN ACTION OF CONTRACT, TORT OR OTHERWISE, ARISING FROM, OUT OF OR IN CONNECTION WITH THE SOFTWARE OR THE USE OR OTHER DEALINGS IN THE SOFTWARE.
Stage, commit, and push "upstream" to your remote repo.
git add LICENSE
git commit -m "Add license to project"
git push origin master
Tagging the first Production Release
After running those commands, we have the first version of our software added to the master branch of our repository. I know it is extremely simple, but we will just go with it and call it our "production web app". Since we committed to the master branch, we will need to tag this first commit as "v1.0". First, we will see what tags already exist in our repository:
git tag
This should not return anything because we have not tagged anything yet. To add a tag, we will run the following command.
git tag -a v1.0 -m "Added first tag"
The -a stands for an "annotated tag", and v1.0 is the actual tag. With an annotated tag, we need to add a message to our tag. We can then see the details of this tag by typing:
git show v1.0
This will show who made the tag, the date of the tag, and the message of the tag along with other information. Let's push this up to Github.
git push --tags origin master
Since we haven't added anything since our last push, we must use the --tags flag to only push the new tag. This worked easily because we were on both the branch and the commit that we wanted to tag. We will come back to this topic later with a bit more complicated example.
Creating and working with branches
Now that we have a production release, we cannot continue to commit code to the master branch. Code needs to be tested and reviewed before releasing to production, so it is best that we do all of our development on a new branch. Let's first look at what branches are already in our repository.
git branch --list

# * master
All you should see is the master branch. To create a "develop" branch with the exact code that is in the master branch already, we will run the following command.
git branch develop

# Now run the list command again
git branch --list

# develop, * master
At this point, we have two branches (master, develop) and two commits. Before things start getting convoluted in our heads, let's take a moment to visualize what is going on. Type the following command to list out all the commits we have done.
git log

# Could also run
git log --pretty=oneline
This will print out the following:
Author: Zach Gollwitzer <email hidden for confidentiality>
Date:   Mon Mar 11 17:12:28 2019 +0000

    Add license to project

commit 7087a7eeab6803e957c3d9468e9f7a17d5043a05
Author: Zach Gollwitzer <email hidden for confidentiality>
Date:   Mon Mar 11 17:11:49 2019 +0000

    First commit
The alternative "pretty" command will output:
ccb5d8e8c35364f2c98fb9f380404697973e11e8 (HEAD -> master, tag: v1.0, origin/master, develop) Add license to project
7087a7eeab6803e957c3d9468e9f7a17d5043a05 First commit
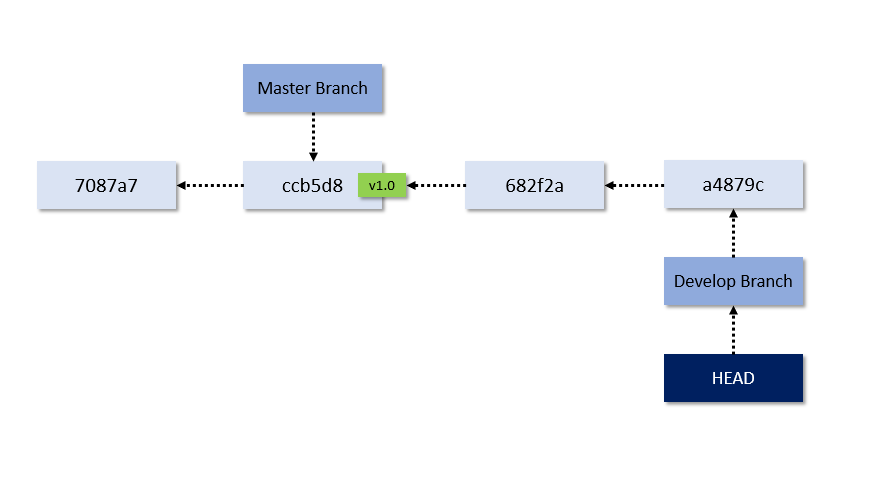
Notice how in the second version of the command, we see (HEAD -> master, tag: v1.0, origin/master, develop). What does all this mean? To answer that question, we need to understand what branches are and how they work. Currently, our Git repository looks like this:
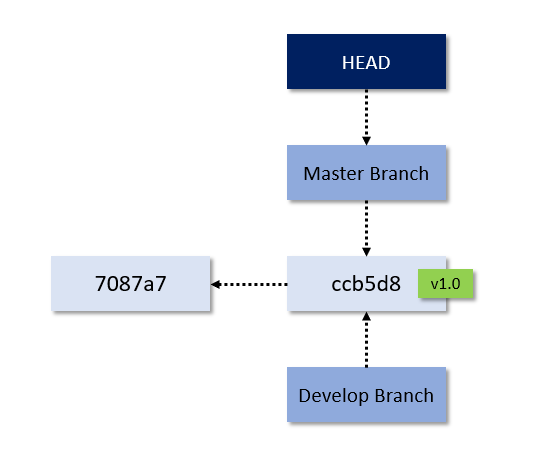
At its essence, Git is a tool that uses pointers to track "snapshots" of files. In our diagram, the arrows represent where each pointer points to. The two commits are abbreviated to just their first six characters. You can see that the latest commit points to the previous commit, and both the develop and master branches both point to the most recent commit. But what is the HEAD box represent?
Understanding what the HEAD pointer does is paramount to understanding Git. The HEAD pointer will always be pointing at something, and whatever it is pointing at is the snapshot that you are currently working in. In this case, we see that HEAD is pointing at master which is pointing at the most recent commit. Yes, we created the develop branch just a moment ago, but HEAD is still pointing at master, which means that any changes that we stage and commit will be on the master branch. Let's switch to the develop branch because we do not want to make changes to our "production" release v1.0.
git checkout develop
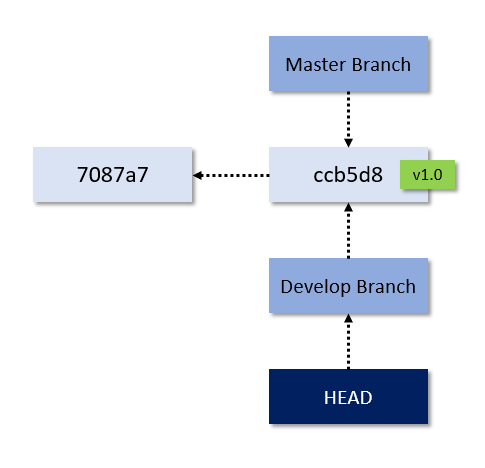
As you can see in the diagram, this command has told the HEAD pointer to point at this new develop branch. Now, anything we change in the repository will be updated on this develop branch. Let's go ahead and update our HTML file with some CSS.
<html>
  <head>
    <title>Simple Webpage</title>
    <style>
      body {
        font-family: monospace;
        color: navy;
        padding: 40px;
      }

      .header {
        font-weight: 500;
      }
    </style>
  </head>
  <body>
    <h1 class="header">Hello World</h1>
    <br />
    <p>Welcome to the Git Tutorial</p>
  </body>
</html>
Now, stage, commit, and push these changes.
git add index.html
git commit -m "Add CSS to HTML"
git push origin develop
Notice how this time, we are pushing to the develop branch. We now have a repository that looks like the following:
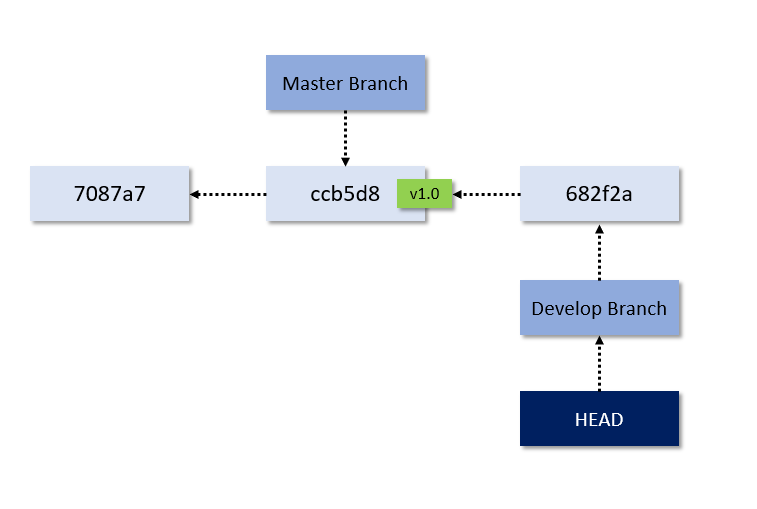
The master branch is now an entire commit behind the develop branch, and if we wanted to do a second "release" to version 1.1, we would need to "fast forward" the master branch pointer to point at this new commit.
Let's make a couple more commits to our develop branch in preparation for our second production release. First, we will break out the HTML and CSS into separate files and commit that change. Edit the index.html file to look like the following:
<html>
  <head>
    <title>Simple Webpage</title>
    <link rel="stylesheet" href="./style.css" type="text/css" />
  </head>
  <body>
    <h1 class="header">Hello World</h1>
    <br />
    <p>Welcome to the Git Tutorial</p>
  </body>
</html>
And create a new file called style.css and add the following to it.
body {
  font-family: monospace;
  color: navy;
  padding: 40px;
}

.header {
  font-weight: 500;
}
Finally, stage, commit, and push upstream.
git add index.html style.css
git commit -m "Split HTML and CSS into two files"
git push origin develop
Our repository now looks like this:
Before we make any more changes to the develop branch, let's create a feature branch called feat1 to work on adding some javascript to our HTML document.
First, confirm that you are on the develop branch:
git branch

# * develop
#  master
Once you have confirmed that, create your feature branch from the develop branch.
# Create the branch
git branch feat1

# Set the HEAD pointer to point at this branch
git checkout feat1
Usually we would only be creating a new feature branch under the following circumstances:
- We are working on a team and multiple team members are simultaneously working on different features that are all based on the code from the
developbranch - We are working alone and we know that we will need to make changes to the develop branch before the feature is done.
In this case, we will assume that this feature is super complex and will take us days to finish. Let's do our first "day" of work by creating a javascript file and adding it to the HTML.
Edit index.html.
<html>
  <head>
    <title>Simple Webpage</title>
    <link rel="stylesheet" href="./style.css" type="text/css" />
  </head>
  <body>
    <h1 class="header hidden" id="header-id">Hello World</h1>
    <br />
    <p>Welcome to the Git Tutorial</p>
    <script src="./script.js"></script>
  </body>
</html>
Create script.js and add the following:
// Wait for window to load
document.addEventListener("DOMContentLoaded", function (event) {
  // Get reference to header object
  let myHeader = document.getElementById("header-id");

  // Wait 3 seconds, then display the header
  setTimeout(() => {
    myHeader.classList.remove("hidden");
  }, 3000);
});
Finally, update the CSS file style.css to have a hidden class.
body {
  font-family: monospace;
  color: navy;
  padding: 40px;
}

.header {
  font-weight: 500;
}

.hidden {
  display: none;
}
You are now ready to make your first commit to the feat1 branch.
git add index.html style.css script.js
Since we added several files, let's check to see what is in our staging area with the following command.
git status
On branch feat1
Changes to be committed:
  (use "git reset HEAD <file>..." to unstage)

        modified:   index.html
        new file:   script.js
        modified:   style.css
It tells us that we are on branch feat1 and we have 3 files in the staging area waiting to be committed. Now, let's commit and push upstream.
git commit -m "Add javascript to code"
git push origin feat1
We shut the computer down for the day and pat ourselves on the back for writing some super super complex javascript. The next day, we realize that there is no .gitignore in our repository! A .gitignore file stored at the root of your repository will tell Git to ignore some files. Maybe you created a little todo-list.txt file in your repository, but you do not want to track this in your repo.
Although an unlikely story, let's create that todo list and .gitignore and commit the .gitignore to our develop branch.
git checkout develop

touch .gitignore

# Tells Git to ignore this todo list file
echo "todo-list.txt" > .gitignore

# Create the untracked file
touch todo-list.txt
echo "Task #1 - Learn Git" > todo-list.txt

# Add all files to staging
git add .

# See what is in staging
git status
You will notice when you run git status that the only file that Git has recognized is the .gitignore. It did not recognize the new todo-list.txt file that we put there. Let's commit and push upstream.
git commit -m "Add .gitignore file"
git push origin develop
Merging Branches
Let's do a little recap here before moving forward. Since last time we looked at our repo we have committed some javascript to our feat1 branch and a .gitignore file to the develop branch. This means that we now have two separate branches that have a parent equal to our latest commit. Run the following command:
git log --oneline --decorate --graph --all
This will give you the following output for our repository (in color on your screen).
* 547a448 (HEAD -> develop, origin/develop) Add .gitignore file
| * 69bdc19 (origin/feat1, feat1) Add javascript to code
|/
* a4879ce Split HTML and CSS into two files
* 682f2aa Add CSS to HTML
* ccb5d8e (tag: v1.0, origin/master, master) Add license to project
* 7087a7e First commit
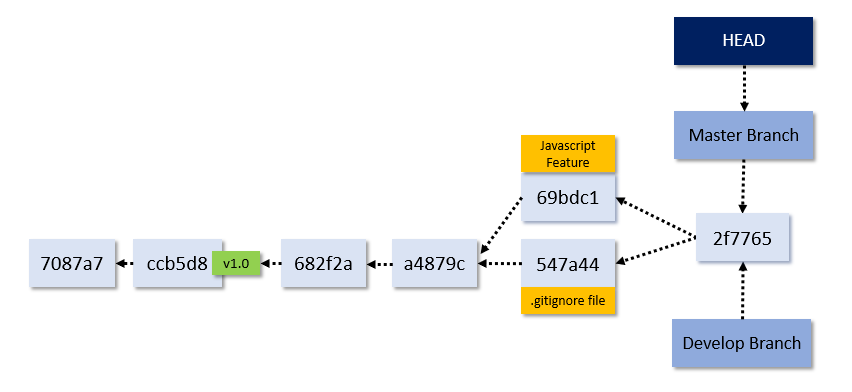
You can already start to visualize what your repo looks like using this log command, but here is a cleaner view for us to visualize it with:
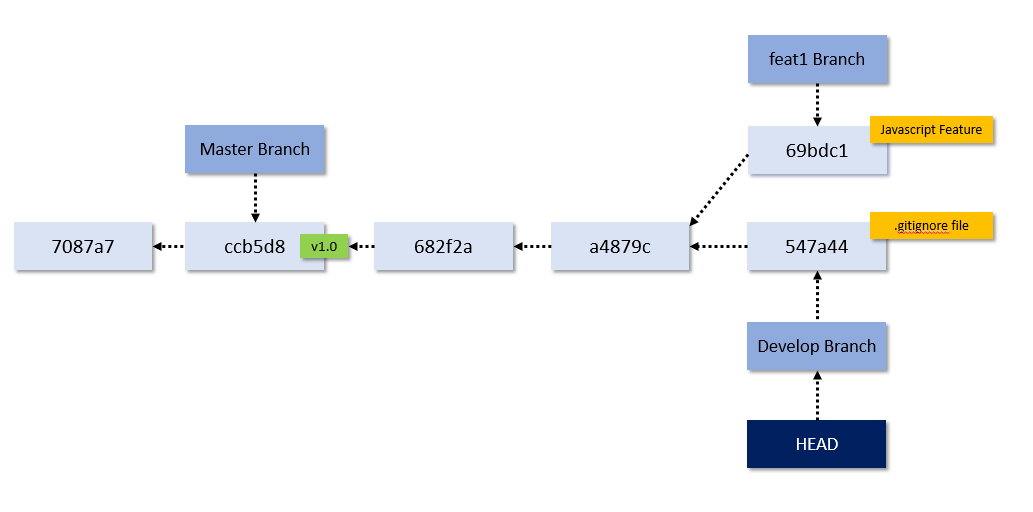
I know this diagram is getting large and difficult to comprehend, so let's take it piece by piece.
- First, direct your attention to the
HEADbox. Since we are currently on thedevelopbranch, ourHEADpointer is pointing at that branch. - Next, look at the three branches (master, develop, feat1). Obviously,
masteris way behind, and if we rangit checkout masterto switch back to it, we would see that many of the files we have created (CSS, javascript, .gitignore) would be gone. Thefeat1anddevelopbranches on the other hand are both the same length, but with different content. If we look at thedevelopbranch files, we will see a.gitignorefile, but no javascript code. If we look at thefeat1branch files, we will see javascript code, but no.gitignorefile. What we have is a complete divergence. - Last, look at the individual commit boxes. When you take out all the noise, your project is no more than a series of commits.
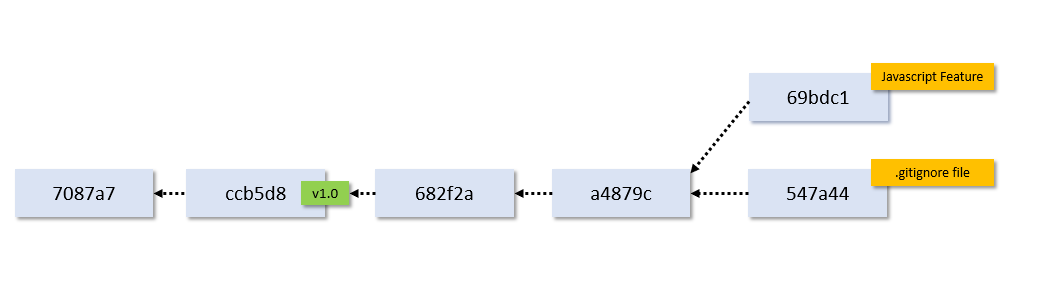
At some point, those two diverging commits at the end will need to join, or "merge" together into one. But how do we choose which one merges into which?
If you remember, the develop branch is the main working branch, so we will want to merge our feat1 branch back into develop. Since we do not have any conflicts between these two commits (i.e. the edited files are completely different in each commit), we can merge feat1 back into develop fairly easily. First, run the git branch command to make sure that you are on the develop branch. Since we are merging into the develop branch, we need to be on it.
git branch

# * develop
#  feat1
#  master
Once we are sure we are on the develop branch, we can merge feat1 into it.
# Merge feat1 branch into develop branch
git merge feat1
You will be prompted with a message. Just type :wq to save and quit the message. After doing this, you have merged feat1 branch into develop! You can confirm this by typing:
git branch --mergedYou should see master in this list because everything that is in master is also in develop. You will see feat1 there because after our merge, everything in feat1 is now also in develop. Since this is the case, we can delete the feat1 branch with the following command.
git branch -d feat1

# Deleted branch feat1 (was 69bdc19).
Finally, type that fancy logging command to see what our repo looks like again.
git log --oneline --decorate --graph --allYou should see the following:
*   2f7765d (HEAD -> develop) Merge branch 'feat1' into develop
|\
| * 69bdc19 (origin/feat1) Add javascript to code
* | 547a448 (origin/develop) Add .gitignore file
|/
* a4879ce Split HTML and CSS into two files
* 682f2aa Add CSS to HTML
* ccb5d8e (tag: v1.0, origin/master, master) Add license to project
* 7087a7e First commit
You can now see that HEAD is pointing at the develop branch, and we have eliminated the divergence! Here is our updated diagram.
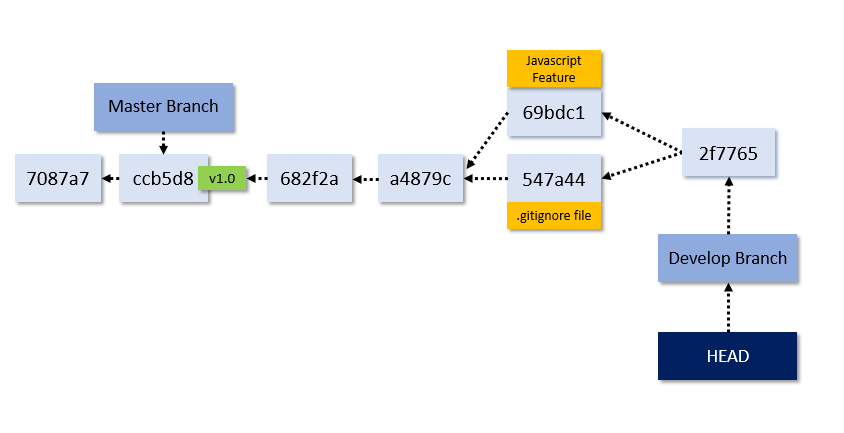
The feat1 branch is gone, and HEAD is now pointed at the most recent commit on the develop branch. I think at this point, we are ready to do our second release!
Let's merge our develop branch into master, and then tag the latest commit on master. If you are developing a complex project, this is the point where you would want to "bump" your version to the next version.
# Switch to master branch
git checkout master

# Merge develop into master
git merge develop
Here is the output I got after the merge command:
Updating ccb5d8e..2f7765d
Fast-forward
 .gitignore |  1 +
 index.html | 13 ++++++++++++-
 script.js  | 11 +++++++++++
 style.css  | 13 +++++++++++++
 4 files changed, 37 insertions(+), 1 deletion(-)
 create mode 100644 .gitignore
 create mode 100644 script.js
 create mode 100644 style.css
Notice how it says "Fast-forward" at the top and says that it is updating ccb5d8e to 2f7765d. This just means that Git has taken the master branch pointer and "fast forwarded" it from commit ccb5d8e to commit 2f7765d, which is our latest commit. Let's now tag the release.
git tag -a v1.1 -m "Added second release tag"
Since HEAD is pointed at master which is pointed at our latest commit, the tag will go on the latest commit on the master branch. And finally, our diagram looks like this:
You are now ready to start working on the develop branch again for your next software release!
git checkout develop

# Do lots of work!