
In this post, I will be walking through some of the most common problems you might run into with this workflow and other advanced topics. Since doing everything in the terminal can get tedious at times, I will also be introducing some of Visual Studio Code's source control features that might help you with tricky problems. That said, I will show the terminal version of each feature that VSCode covers so that you can be fully sufficient just in the terminal!
While working with Git, you will run into problems, and half the battle is knowing how to solve them without either losing your work or completely screwing up your repository to the point where you just have to re-clone it on your computer and start over. Sometimes, a clean slate is the only option, but usually, you get to the point of no return because your understanding of Git is lacking and you end up trying a bunch of things that cause more damage.
This post should really be called "Git damage control" because it is your troubleshooting guide for the Git workflow I introduced in my branching post. In each sub-section, I will introduce a new problematic scenario based on the repository we already created, and then show the solution how to fix it.
Merge Conflicts between Local and Remote Repos
A merge conflict happens when you try to combine two or more snapshots of code into a single commit, but there exists a point in each snapshot that conflicts.
One of the most common ways that conflicts are created is when the upstream repository (i.e. the remote repository that lives on Github) has been updated by one or more team members and you try to pull down changes to your local repository.
I am now going to create a merge conflict by editing the README.md with a test Github user and as my user locally.
First, my test user "testuser-for-git-tutorial" will make a change to the README.
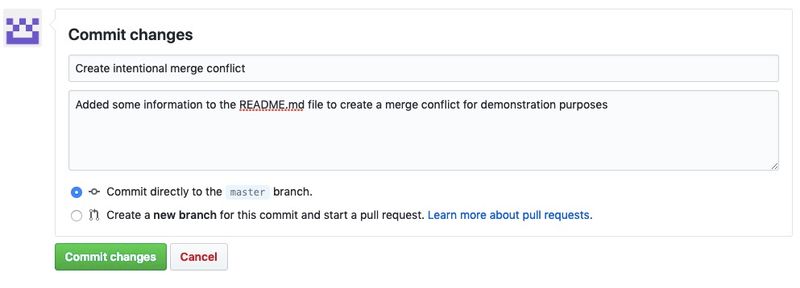
Now, I will edit the README.md file on my local repository.
At this point, my local repository has the following contents in README.md.
This repository will show you a basic git workflow for individuals or small teams

A local edit that will conflict with the upstream repository.
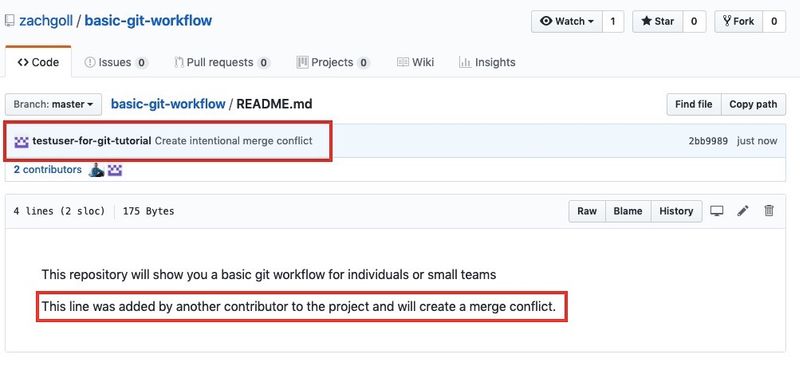
And the remote repository has the following contents.
This repository will show you a basic git workflow for individuals or small teams

This line was added by another contributor to the project and will create a merge conflict.
Clearly, these two versions of the same file do not match, and when we try to run the command git pull in our local repository, there will be a conflict. Let's give it a try and see what happens.
git pull origin master
The output says:
remote: Enumerating objects: 5, done.
remote: Counting objects: 100% (5/5), done.
remote: Compressing objects: 100% (3/3), done.
remote: Total 3 (delta 2), reused 0 (delta 0), pack-reused 0
Unpacking objects: 100% (3/3), done.
From https://github.com/zachgoll/basic-git-workflow
 * branch            master     -> FETCH_HEAD
   2bb9989..a589f47  master     -> origin/master
Updating 2bb9989..a589f47
error: Your local changes to the following files would be overwritten by merge:
        README.md
Please commit your changes or stash them before you merge.
Aborting
It says that our local changes will be overwritten by the merge. We have three options here:
- We could commit your local changes, and then the
git pullwill just overwrite them in a new commit. In this case, the most recent version will be the one that my test user has edited. - If we do not care about our local changes and just want to get the most recent version from the remote repository, we can run the
git stashcommand and then thegit pullcommand again. This will "stash" the conflicting local changes for later retrieval (rungit stash listandgit stash applyto get those files back). - We could completely reset the local repository to its previous state with the command
git reset HEAD --hard
I will use the second option because it is usually the safest and most practical. In my local repository, I will run the following.
git stash
git pull origin master
After running this, you will see contents edited by the test user:
This repository will show you a basic git workflow for individuals or small teams

This line was added by another contributor to the project and will create a merge conflict.
But what if we don't want this? What if we want to replace this with our local changes? Well, we can get the contents from our git stash command back. Run the following command.
git stash list

# stash@{0}: WIP on master: 2bb9989 Create intentional merge conflict
You will see that stash@{0} contains the local changes that we want to restore. To restore those changes, run the following command.
git stash apply stash@{0}
Merge Conflicts in local repo
It now tells us that there is a local merge conflict. This is the same message you might receive if you are trying to merge one branch into another that have conflicting snapshots. When Git detects a merge conflict among your local repository, it will place some additional lines in the conflicting file. At this moment, README.md has the following contents as the result of our merge conflict.
This repository will show you a basic git workflow for individuals or small teams

<<<<<<< Updated upstream
This line was added by another contributor to the project and will create a merge conflict.
=======
A local edit that will conflict with the upstream repository.
>>>>>>> Stashed changes
I know it looks intimidating, but all this is doing is telling us what the incoming change is (the stashed file), and what the existing file looks like. Since we want to replace the current contents with the stashed changes, we can just open the file and delete everything but the stashed changes (i.e. lines 3, 4, 5, and 7).
Finally, we must stage and commit the local changes.
git add README.md
git commit -m "Merge stashed changes back into README"
git push origin master
Okay, okay. I know this example might have seemed pointless. We could have easily just copy and pasted the line we wanted back into README.md without going through the merge conflict resolution. But through this simple example, we learned how to fix remote/local conflicts with stashing, how to restore a stash, and how to fix a local merge conflict all in one!
Fixing Merge Conflicts with VSCode
Let's create a new branch, make some edits that conflict with the master branch, and try to merge this new branch into the master branch.
git branch merge-conflict-branch
git checkout merge-conflict-branch
Now that you are on the new branch, edit README.md again to say:
This repository will show you a basic git workflow for individuals or small teams

I made this change from the `merge-conflict-branch`.
Notice how line 3 is once again conflicting with what is on our master branch. Go ahead and commit those changes on the merge-conflict-branch, and switch back to the master branch.
git add README.md
git commit -m "Created another merge conflict from merge-conflict-branch"

# Switch back to master
git checkout master
Before merging, lets make a small edit to README.md from our master branch to make the conflict. Edit the file to say:
This repository will show you a basic git workflow for individuals or small teams

Some new text that will create a merge conflict.
Stage and commit these changes, and then try to merge the new branch into master.
git add README.md
git commit -m "create merge conflict"

# Merge into master
git merge merge-conflict-branch
Again, we will get an error.
Auto-merging README.md
CONFLICT (content): Merge conflict in README.md
Automatic merge failed; fix conflicts and then commit the result.
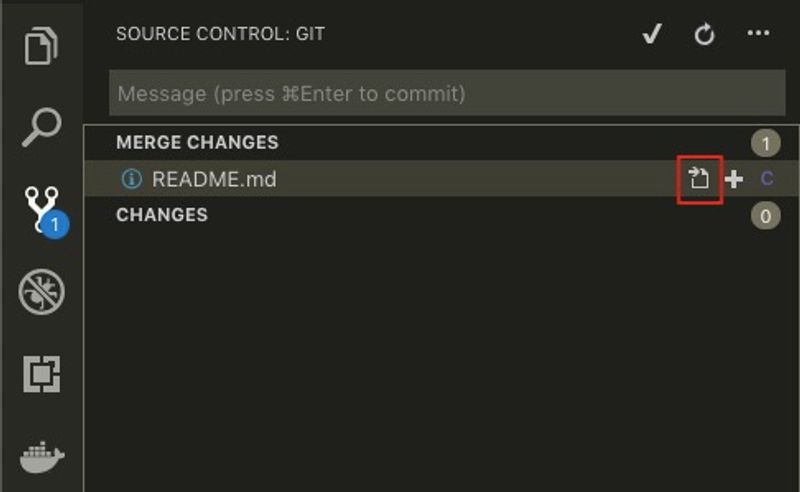
But this time, we will fix it using VSCode's built in source control tools. Open up your repository in VSCode and click on the source control tab in the sidebar.

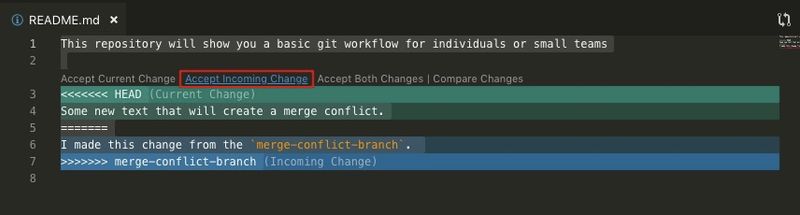
Open the merge conflict file (README.md).
Accept the incoming change.
Save the file and click the plus icon on the file to stage the changes (i.e. the git add README.md command).

Click the checkmark to commit the staged changes and add a commit message.

You have now fixed your merge conflict and committed your changes all within VSCode! This may not seem any easier than what we did before, but wait until you have tens, if not hundreds of merge conflicts to fix on a single merge! This tool will come in handy then!
Reverting, Resetting, and Checking Out
The git reset, git revert, and git checkout commands are similar and therefore confuse lots of users (including myself for the longest time). I really like the comment in this stackoverflow post on the differences:
"Candlesticks, lead pipes, daggers, and rope can all be used to murder people, but that doesn't mean any of those things are particularly similar."
If you try to learn ALL the capabilities of these commands, it will take a long time and probably create lots of confusion. In this section, we will try and cover the essentials of each. Once you have mastered these essentials, you can start using them for more complex operations.
The 3 Trees
To understand any of these commands, we need a basic knowledge of what Git documentation calls the "3 Trees". These include:
- HEAD
- Index
- Working
I do not find these three names easy to remember, so we will go with the following:
- Repo
- Staged
- Unstaged
In other words, the HEAD tree effectively refers to the current state of the repository, the Index tree refers to anything in the staging area (from using the git add command), and the Working tree refers to anything that you have changed on your computer but have not yet added (git add) to the staging area. There are effectively 4 states that your workflow can be in at any given moment (yes, there are more combinations, but far too unlikely for me to cover):
- Repo = Staged = Unstaged
- Repo = Staged, but unstaged does not equal either
- Staged = Unstaged, but repo does not equal either
- All three are different
Let's create each scenario in our repo. First, make sure you are in state #1 by typing git status. If you are, you will see a message that says
On branch master
nothing to commit, working tree clean
Let's make a new file called three-trees.txt.
touch three-trees.txt
echo "The three trees of Git are simpler than you think!" > three-trees.txt
You are now in state #2, and should see the following when typing git status.
On branch master
Untracked files:
  (use "git add <file>..." to include in what will be committed)

        three-trees.txt

nothing added to commit but untracked files present (use "git add" to track)
Let's add this to the staging area.
git add three-trees.txt
You are now in state #3, and your git status should show:
On branch master
Changes to be committed:
  (use "git reset HEAD <file>..." to unstage)

        new file:   three-trees.txt
If you were to commit the file right now, you would be taken back to state #1 where all three trees are equal (repo=staged=unstaged). Let's create one more file to enter state #4.
touch additional-file.txt
echo "Random text contents" > additional-file.txt
Your git status will now show:
On branch master
Changes to be committed:
  (use "git reset HEAD <file>..." to unstage)

        new file:   three-trees.txt

Untracked files:
  (use "git add <file>..." to include in what will be committed)

        additional-file.txt
You are in state #4, which means that the repo does not equal the staged which does not equal the unstaged. Here is what is in each tree:
Repo - No files Staged - three-trees.txt Unstaged - three-trees.txt and additional-file.txt
Let's get back to state #1 by adding and committing.
git add additional-file.txt
git commit -m "Create three trees tutorial section"
You are now back to a clean, state #1. As we move through these three commands, always be aware of which of the four states you are in because the commands will react differently to different states. When running any of these three commands, you want to be in state #1 to avoid conflicts and errors.
Git Checkout
We will start with git checkout because it is something that we have looked at previously. This command serves the function of modifying the view of your unstaged files. With it, you can checkout an entire branch or even just a single commit. We will try both and see the implications of each.
Let's first take a look at our entire repository with the following command.
git log --oneline --decorate --graph --all
* 09dda7b (HEAD -> master) Create three trees tutorial section
*   fa61317 (origin/master) Resolved merge conflict from VSCode
|\
| * d13ee52 Create merge conflict
* | 6598c74 Add new text to README to create merge conflict
|/
* e9d7818 Created another merge conflict from merge-conflict-branch
* 01bc44a Merge stashed changes back into README
* a589f47 Create intentional merge conflict
* 2bb9989 Create intentional merge conflict
*   2f7765d (tag: v1.1, develop) Merge branch 'feat1' into develop
|\
| * 69bdc19 (origin/feat1) Add javascript to code
* | 547a448 (origin/develop) Add .gitignore file
|/
* a4879ce Split HTML and CSS into two files
* 682f2aa Add CSS to HTML
* ccb5d8e (tag: v1.0) Add license to project
* 7087a7e First commit
This represents the entire history of what I have done in my repository. For simplicity, we have been committing to our master branch, and therefore, the develop branch is going to be a few commits behind. You are already familiar with how we checkout this branch. Remember, you need to be in state #1 to do this without errors!
git checkout develop
At this point, we are still in state #1, but all three of our trees have changed! Go back and look at the log of our repository. With this git checkout develop command, we have switched the HEAD pointer (repo) to point at the develop branch, which points at commit 2f7765d. In other words, we are still in state #1, but the contents of each tree does not include any of the latest files we have added to the master branch. If you run the following command, you will see the output is far shorter than when we printed it before. Notice that in this command, I have removed the --all flag so we are only printing the history of the develop branch (which refers to commits from master which is why the first couple commits match).
git log --oneline --decorate --graph
*   2f7765d (HEAD -> develop, tag: v1.1) Merge branch 'feat1' into develop
|\
| * 69bdc19 (origin/feat1) Add javascript to code
* | 547a448 (origin/develop) Add .gitignore file
|/
* a4879ce Split HTML and CSS into two files
* 682f2aa Add CSS to HTML
* ccb5d8e (tag: v1.0) Add license to project
* 7087a7e First commit
You can see that HEAD (repo) is pointed at the develop branch on commit 2f7765d which is the most recent commit in this branch. We could even checkout the very first commit of our repository:
git checkout 7087a7e
You will get the following message:
Note: checking out '7087a7e'.

You are in 'detached HEAD' state. You can look around, make experimental
changes and commit them, and you can discard any commits you make in this
state without impacting any branches by performing another checkout.

If you want to create a new branch to retain commits you create, you may
do so (now or later) by using -b with the checkout command again. Example:

  git checkout -b <new-branch-name>

HEAD is now at 7087a7e... First commit
It says that we are in a "detached HEAD state" because HEAD no longer points at any of our branches. We are still in state #1 and our position looks like this:
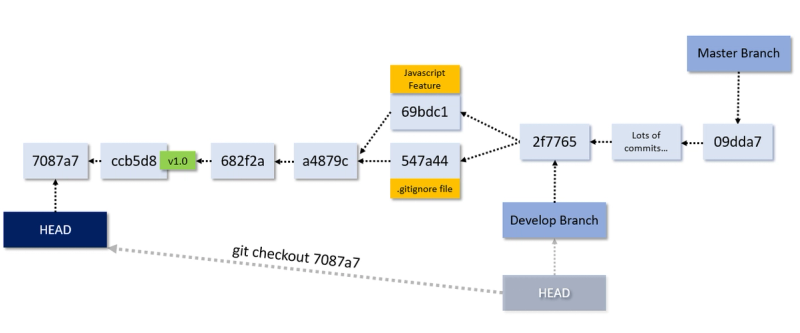
We could now create a new branch and start working from the beginning of our repository at the same time other team members are continuing their efforts at the latest commit. We have no reason to do so, so let's get back to our original place and state.
git checkout master
We are back where we started in state #1.
Git Revert
Take another look at our repository.
git log --oneline --decorate --graph --all
* 09dda7b (HEAD -> master) Create three trees tutorial section
*   fa61317 (origin/master) Resolved merge conflict from VSCode
|\
| * d13ee52 Create merge conflict
* | 6598c74 Add new text to README to create merge conflict
|/
* e9d7818 Created another merge conflict from merge-conflict-branch
* 01bc44a Merge stashed changes back into README
* a589f47 Create intentional merge conflict
* 2bb9989 Create intentional merge conflict
*   2f7765d (tag: v1.1, develop) Merge branch 'feat1' into develop
|\
| * 69bdc19 (origin/feat1) Add javascript to code
* | 547a448 (origin/develop) Add .gitignore file
|/
* a4879ce Split HTML and CSS into two files
* 682f2aa Add CSS to HTML
* ccb5d8e (tag: v1.0) Add license to project
* 7087a7e First commit
We are going to do two reversions.
- Revert to the previous commit
- Revert our merge commit
2f7765d
The first example is the simplest version of a revert, and all it does is takes the content modified by our most recent commit (09dda7b), removes it, and makes a new commit to represent the repository without this commit. This is different than deleting a commit because it creates a new commit to represent the change. In other words, it documents the "undo" in our source control and allows us to effectively undo our undo if we want.
Below is a visual (disregard the actual commit hashes as they are made up):
Before we run the reversion, let's take a look at what our most recent commit did. We can do this by using the git show <commit-id> command.
git show 09dda7b
commit 09dda7b75a1bc5d40fe6daa77fc859147d02cf03 (HEAD -> master)
Author: Zach Gollwitzer <email protected for privacy>
Date:   Wed Mar 13 14:36:00 2019 +0000

    Create three trees tutorial section

diff --git a/additional-file.txt b/additional-file.txt
new file mode 100644
index 0000000..f7c8b7d
--- /dev/null
+++ b/additional-file.txt
@@ -0,0 +1 @@
+Random text contents
diff --git a/three-trees.txt b/three-trees.txt
new file mode 100644
index 0000000..e048800
--- /dev/null
+++ b/three-trees.txt
@@ -0,0 +1 @@
+The three trees of Git are simpler than you think!
Remember, we created three-trees.txt and additional-file.txt. After our reversion, we expect those files to be gone from the repo, staged, and unstaged trees. To run this reversion, type the following command.
git revert HEAD
The HEAD represents the "most recent commit". You could say HEAD~ for "The second most recent commit" and HEAD~~ (etc.) for the "The third most recent commit". When you run this command, you will see the following output:
[master 76ba921] Revert "Create three trees tutorial section"
 2 files changed, 2 deletions(-)
 delete mode 100644 additional-file.txt
 delete mode 100644 three-trees.txt
You can see that both of these files created by the most recent commit was deleted. You can run ls to see that they no longer exist in the non-staged area either. Now run the log command again to see where you are at.
git log --oneline --decorate --graph --all
* 76ba921 (HEAD -> master) Revert "Create three trees tutorial section"
* 09dda7b Create three trees tutorial section
*   fa61317 (origin/master) Resolved merge conflict from VSCode
|\
| * d13ee52 Create merge conflict
* | 6598c74 Add new text to README to create merge conflict
|/
* e9d7818 Created another merge conflict from merge-conflict-branch
* 01bc44a Merge stashed changes back into README
* a589f47 Create intentional merge conflict
* 2bb9989 Create intentional merge conflict
*   2f7765d (tag: v1.1, develop) Merge branch 'feat1' into develop
|\
| * 69bdc19 (origin/feat1) Add javascript to code
* | 547a448 (origin/develop) Add .gitignore file
|/
* a4879ce Split HTML and CSS into two files
* 682f2aa Add CSS to HTML
* ccb5d8e (tag: v1.0) Add license to project
* 7087a7e First commit
You'll see that an additional commit has been created with the reversion. Now, run the following command.
git reset --hard HEAD~
This will DELETE everything we just did. I will explain how this command works later, but for now, just imagine that we never made the reversion in the first place.
Now that we are back where we started, we can make the second type of reversion. Let's say that for some reason, we do not like the new feature we introduced from the feat1 branch. We do not want to delete our most recent changes, but we want to remove the commit that merged our feature into the develop branch. If we look at the repo history, we can see that the merge commit was 2f7765d. Let's take a look at the two commits that were combined to create the merge commit:
git show --format="%nHash: %h%nCommit Message: %s%nParent Hashes: %P" --stat-name-width=50 69bdc19 547a448
This command will give us nice and clean output:
Hash: 69bdc19
Commit Message: Add javascript to code
Parent Hashes: a4879ceb44e09e386f6c145cc6b0bbd81fe8d8e0

 index.html |  3 ++-
 script.js  | 11 +++++++++++
 style.css  |  4 ++++
 3 files changed, 17 insertions(+), 1 deletion(-)

Hash: 547a448
Commit Message: Add .gitignore file
Parent Hashes: a4879ceb44e09e386f6c145cc6b0bbd81fe8d8e0

 .gitignore | 1 +
 1 file changed, 1 insertion(+)
What this tells us is that the commit 69bdc19 added three files (index.html, script.js, and style.css) while commit 547a448 created the .gitignore file. When the two commits were merged into one, we were left with a single merge commit 2f7765d that has all four files in it.
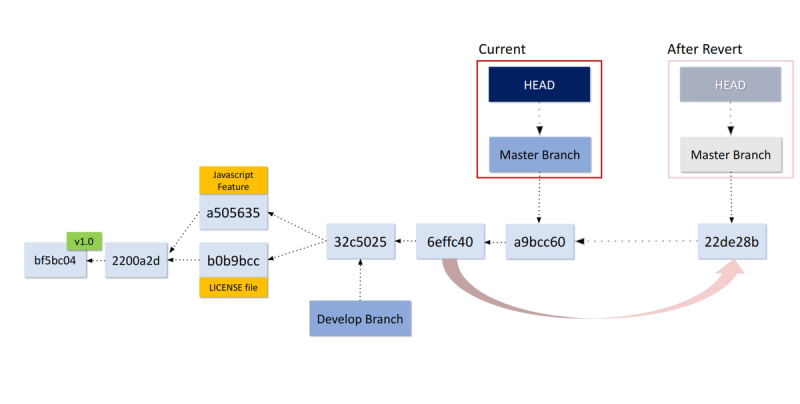
Before we do the reversion, we need to figure out what "parent" we want to revert back to. Before you freak out and run, give me a moment to explain this rather complicated process. First, let's remember what was going on back at commit 2f7765d. When we created this commit, we were merging the feat1 branch into the develop branch.
For our revert command, we need to specify which of these two divergent branches we want to use as the "parent". In other words, if we choose feat1 as the parent (commit 69bdc19), our new commit will incorporate the three files (html, css, js) but lack the .gitignore file. If we choose develop as the parent (commit 547a448), our new revert commit will have the .gitignore file, but not the three other files.
But how do we know which parent is which? To find out, we can run the same git show command as above.
Hash: 2f7765d
Commit Message: Merge branch 'feat1' into develop
Parent Hashes: 547a4488bf61da4af4e5b728310ff5694ce381dc 69bdc19075a4f96db92118478255a638f0ce6214

 index.html |  3 ++-
 script.js  | 11 +++++++++++
 style.css  |  4 ++++
 3 files changed, 17 insertions(+), 1 deletion(-)
But what about the gitignore file? Wasn't that supposed to be in the merge commit? Well, it is, but since we are merging into develop, this merge commit only will show the incoming changes and not the existing ones. Anyways, what we are interested in here are the two parent hashes.
Parent #1 is the 547a448 commit and parent #2 is the 69bdc19 commit. Since we want to remove feat1 from our repository, we must select parent #1, which has the .gitignore file but not the other three files.
git revert --edit --mainline 1 2f7765d
You will see the following message:
[master 8e2abf9] Revert "Merge branch 'feat1' into develop"
 3 files changed, 1 insertion(+), 17 deletions(-)
 delete mode 100644 script.js
The script.js file will be deleted, and any modifications made to index.html and style.css on the feat1 branch will be removed (but not necessarily delete the files).
I know this section on git revert was a strenous one, but hopefully it clears up a few things!
Git Reset
The git reset command is similar to git revert, but instead of adding a new commit with the removed changes, the command will just "delete" the unwanted changes completely. I say "delete" in quotations because depending on the options you give this command, you will get a slightly different result. We will start with the least potentially harmful version and move towards the most potentially harmful command. The commands in this section build on each other, so git reset --soft is a part of git reset --mixed which is a part of git reset --hard. Said another way, git reset --hard is the combination of all three versions of the command.
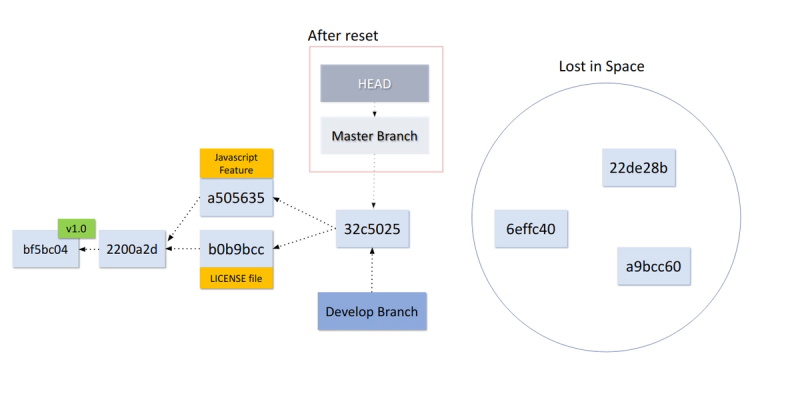
Below is a diagram (the commit hashes are not in line with the repository we have been following, but will demonstrate the concept) that illustrates what the git reset command does.
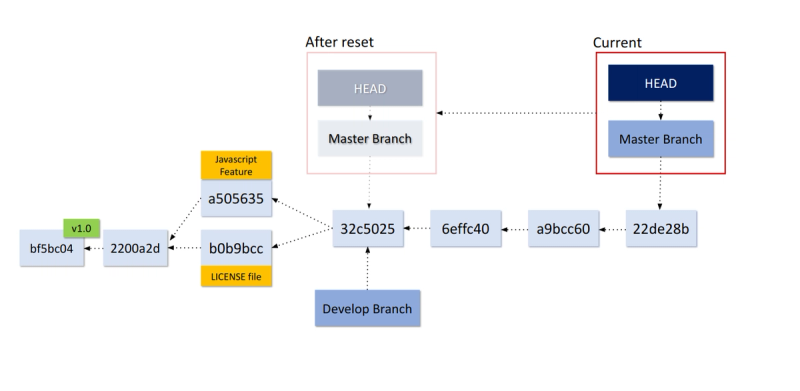
We are moving HEAD and whatever HEAD points to (master) backwards to another commit. In effect, the commits that we have moved back from will be floating around in space and we have no way of locating them. Depending on the version of the git reset command that you run, you may or may not be able to recover the changes from those floating commits.
Before we start this section, let's recall the four possible states you can be in:
- Repo = Staged = Unstaged
- Repo = Staged, but unstaged does not equal either
- Staged = Unstaged, but repo does not equal either
- All three are different
We are currently in state #1 according to our git status command.
zachgoll:~/workspace/git-workflow (master) $ git status
On branch master
nothing to commit, working tree clean
git reset --soft
All git reset --soft does is move the pointer that HEAD points to.
git reset --soft 2f7765d
The previous command will move the branch that HEAD points to from commit 76ba921 to commit 2f7765d. This makes more sense with a visual (commit hashes are accurate in this one!):

Unlike the git checkout command where we literally move the HEAD pointer, with git reset --soft, we are moving the HEAD pointer and the branch it points to, which is master in this case.
This command will change the repo, but it will not change the staged changes or the unstaged changes. If you run git status, you will see that all of the files that we created after the v1.1 release are now in the staged and unstaged area, but not the repo, hence we would be in state #3.
Let's commit all the files again.
git commit -m "Add all files since v1.1 release"
When we do this, we will have the following history:
* dc8e366 (HEAD -> master) Add all files since v1.1 release
| *   fa61317 (origin/master) Resolved merge conflict from VSCode
| |\
| | * d13ee52 Create merge conflict
| * | 6598c74 Add new text to README to create merge conflict
| |/
| * e9d7818 Created another merge conflict from merge-conflict-branch
| * 01bc44a Merge stashed changes back into README
| * a589f47 Create intentional merge conflict
| * 2bb9989 Create intentional merge conflict
|/
*   2f7765d (tag: v1.1, develop) Merge branch 'feat1' into develop
|\
| * 69bdc19 (origin/feat1) Add javascript to code
* | 547a448 (origin/develop) Add .gitignore file
|/
* a4879ce Split HTML and CSS into two files
* 682f2aa Add CSS to HTML
* ccb5d8e (tag: v1.0) Add license to project
* 7087a7e First commit
Notice how the reversion is no longer there and it looks like we just added all these files directly after the release.
git reset --mixed
Let's do the same exact thing again, but instead of --soft, we will use --mixed.
git reset --mixed 2f7765d
When we run git status, we get a slightly different output.
On branch master
Changes not staged for commit:
  (use "git add/rm <file>..." to update what will be committed)
  (use "git checkout -- <file>..." to discard changes in working directory)

        modified:   README.md
        modified:   index.html
        deleted:    script.js
        modified:   style.css

Untracked files:
  (use "git add <file>..." to include in what will be committed)

        additional-file.txt
        three-trees.txt

no changes added to commit (use "git add" and/or "git commit -a")
We are now in state #4. The repo now reflects the files that were present back in v1.1, the staged area has nothing in it at all, and the unstaged area has all the modifications that we have made since release v1.1. Let's add the files back to the staging area and commit them.
git add .
git commit -m "Add all files since v1.1 release"
git reset --hard
This last version of git reset is the most dangerous, because it will permanently undo parts of your repository. For example, if you ran this command and specified the first commit in the repository, all your work would be lost. That said, Git is a decentralized source control tool, and chances are you will still have those changes on your remote repository or maybe even on one of your teammate's computers. Nevertheless, be careful with this one and only use it if you know the implications of what it will do.
Our repository currently looks like this:
* 942fac1 (HEAD -> master) Add all files since v1.1 release
| *   fa61317 (origin/master) Resolved merge conflict from VSCode
| |\
| | * d13ee52 Create merge conflict
| * | 6598c74 Add new text to README to create merge conflict
| |/
| * e9d7818 Created another merge conflict from merge-conflict-branch
| * 01bc44a Merge stashed changes back into README
| * a589f47 Create intentional merge conflict
| * 2bb9989 Create intentional merge conflict
|/
*   2f7765d (tag: v1.1, develop) Merge branch 'feat1' into develop
|\
| * 69bdc19 (origin/feat1) Add javascript to code
* | 547a448 (origin/develop) Add .gitignore file
|/
* a4879ce Split HTML and CSS into two files
* 682f2aa Add CSS to HTML
* ccb5d8e (tag: v1.0) Add license to project
* 7087a7e First commit
We could certainly reset the entire repository to v1.1, but I want to keep all the changes there for your reference when going through this tutorial. Therefore, we need to make a bunch of useless commits for the sole purpose of deleting them. Run all the commands below.
touch useless-file.txt
echo "useless data" > useless-file.txt
git add useless-file.txt
git commit -m "Make useless commit #1"

echo "more useless data" >> useless-file.txt
git add useless-file.txt
git commit -m "Make useless commit #2"

echo "and some more" >> useless-file.txt
git add useless-file.txt
git commit -m "Make useless commit #3"

echo "one more time" >> useless-file.txt
git add useless-file.txt
git commit -m "Make useless commit #4"
Here is our new repository.
* b3a997c (HEAD -> master) Make useless commit #4
* 38e7d0d Make useless commit #3
* b7748e3 Make useless commit #2
* e6752da Make useless commit #1
* 942fac1 Add all files since v1.1 release
| *   fa61317 (origin/master) Resolved merge conflict from VSCode
| |\
| | * d13ee52 Create merge conflict
| * | 6598c74 Add new text to README to create merge conflict
| |/
| * e9d7818 Created another merge conflict from merge-conflict-branch
| * 01bc44a Merge stashed changes back into README
| * a589f47 Create intentional merge conflict
| * 2bb9989 Create intentional merge conflict
|/
*   2f7765d (tag: v1.1, develop) Merge branch 'feat1' into develop
|\
| * 69bdc19 (origin/feat1) Add javascript to code
* | 547a448 (origin/develop) Add .gitignore file
|/
* a4879ce Split HTML and CSS into two files
* 682f2aa Add CSS to HTML
* ccb5d8e (tag: v1.0) Add license to project
* 7087a7e First commit
Clearly, we do not want the last four commits in our repository, and quite frankly, we probably do not even want anyone to know that they were there in the first place. To completely delete the commits and return to commit 942fac1, we can run the following command.
git reset --hard 942fac1
This will move the master branch pointer back to commit 942fac1 (git reset --soft), remove all the files we just created from the staged area (git reset --mixed), and finally delete all these files from the unstaged area (git reset --hard). No matter where you look, you will not find the useless-file.txt. Not in the Git history, not in your working directory. This command also has the effect of putting you back in state #1 with a completely clean workspace.
The git reset command is most often used in the default state, which is --mixed. In state #3 (after running git add but before git commit), you will often see a message like so:
On branch master
Changes to be committed:
  (use "git reset HEAD <file>..." to unstage)

        modified:   index.html
It recommends to run git reset HEAD. But what does this mean? Let's first look at our repo:
git log --oneline
942fac1 (HEAD -> master) Add all files since v1.1 release
2f7765d (tag: v1.1, develop) Merge branch 'feat1' into develop
547a448 (origin/develop) Add .gitignore file
69bdc19 (origin/feat1) Add javascript to code
a4879ce Split HTML and CSS into two files
682f2aa Add CSS to HTML
ccb5d8e (tag: v1.0) Add license to project
7087a7e First commit
The HEAD pointer is pointing at the master branch which is pointing at commit 942fac1. Running git reset HEAD is exactly equivalent to the following command.
git reset --mixed 942fac1
In effect, your changes will be moved out of the staged area and you will go from state #3 to state #2 where the repo and staged area match up, but we have some changes in our unstaged area still. If you want to delete all your changes that have not yet been committed, just throw in the --hard flag.
git reset --hard HEAD

# Or...
git reset --hard 942fac1
Upstream and Downstream Conflicts
Throughout the last few sections, you might have noticed that we were not running the git push command. We were adding commits to the repository, but they were not getting pushed "upstream" to the remote repository. This is going to create a conflict because of the reversions and resets that we performed. Go ahead and try to push your changes upstream.
git push origin master
You will probably get something like this:
To github.com:zachgoll/basic-git-workflow.git
 ! [rejected]        master -> master (non-fast-forward)
error: failed to push some refs to '[email protected]:zachgoll/basic-git-workflow.git'
hint: Updates were rejected because the tip of your current branch is behind
hint: its remote counterpart. Integrate the remote changes (e.g.
hint: 'git pull ...') before pushing again.
hint: See the 'Note about fast-forwards' in 'git push --help' for details.
We are already aware that our remote repository is ahead of our local one because we reverted and reset the local backwards in time. The hint in the Git message says that we should git pull and then incorporate the new changes into our local repo, but we do not want to do this. We want the remote repository to reflect what is in the local one.
If we were working on a team, the proper way to handle this would be to run a git fetch followed by a git merge (same thing as git pull but broken into steps). This will allow you to sync up your local repo to the remote repo without deleting anything.
Since we are not working on a team here and we really don't care if things get deleted off the remote repository, we can just force the push.
git push --force origin master
Your local and remote repos are now exactly the same and you can continue your work. Again, this is a dangerous command if you are working on a team because it could end up deleting a team member's work on the remote repo!
Conclusion
Git can be a frustrating tool at times, and you might find yourself in situations where you feel like there is no other solution than to start over completely. Maybe you've run git reset too many times and now you have no idea where your files are. Just remember, Git is all about calculated actions. Never run a Git command before you are certain what the effects of it are. I know there is a lot to learn here, but if you take the time to learn it, you will spend far less time freaking out where your work went or why you can't get your local repo to sync with your remote repo.