
Why Use Git?
Git is a widely accepted, open-source, local source control tool that enables single developers or teams to manage their source code in a decentralized way. I devoted an entire section to this question, but truthfully, you won't see the true power of this tool until we start using it.
Installation and Adding Credentials to Git
To install, run the following command on:
Windows (using Chocolatey Package Manager)
choco install git -params '"/GitAndUnixToolsOnPath"'
Mac (using Homebrew Package Manager)
brew install git
Linux (using Aptitude Package Manager)
sudo apt-get install git
Once installed, you will want to add your credentials with the following two commands.
git config --global user.name "Name"
git config --global user.email "Email"
Also, set the settings related to line endings. These settings are not 100% necessary, but a good default. To learn more, you can read up with this Stack Overflow post. In short, depending on which OS you are running on and which utility you use to commit files, the byte character used at the end of each line may be different. It could be a legacy CR (carriage return), a LF (line feed), or CRLF. This can cause issues in a repository because it may show that all files have been modified when they have not been. Anyways... Here are the settings.
# Windows
git config --global core.autocrlf true
git config --global core.safecrlf true

# Mac / Linux / Subsystem for Linux
git config --global core.autocrlf input
git config --global core.safecrlf true
If you want to edit these in a file, you can open up ~/.gitconfig in a text editor. It will look something like this (notice the four lines we added).
[user]
    name = Zach Gollwitzer
    email = <your-email-here>
[core]
    editor = vim
    whitespace = off
    excludesfile = ~/.gitignore
        autocrlf = input
        safecrlf = true
[advice]
    statusuoption = false
[color]
    ui = true
[push]
The last thing you might want to do if you are setting up Git on a personal computer is authenticate with Github (assuming you are using Github as a source control host). This will eliminate the need to type in your username and password every time you want to push or pull from a remote repository. There is the option to add your Git password to your computer's credential store, but I am not showing that method due to the fact that you password is stored unencrypted.
First, check if you already have an SSH key on your computer named "id_rsa" (this is the one that Github accepts). To do this, run the following command.
ls -la ~/.ssh | grep 'id_rsa'
If this command returns two entries or more (id_rsa and id_rsa.pub), then you do not need to create a new key. If it does not return anything, then generate a new SSH key. If you are on Windows, you will need to do this with Putty. Otherwise, generate it with the following command.
cd ~ && ssh-keygen -t RSA
Once you have this key, login to Github and do the following.
- Click on your Profile Settings
- Click "SSH and GPG Keys" on the left-hand tab
- Click "New SSH Key"
- Give the key a unique name (I call mine "personal-pc")
- Go back to the terminal, and print out the public version of your key. If you followed my instructions and called it "github", then you should have two keys saved in the
~/.sshfolder--id_rsaandid_rsa.pub. You want to copy the contents ofid_rsa.pub. Paste that key into the required field in your Github account.
At this point, Github has a record of the computer you are working from. The last step is to make sure that your "remote origin" (more on this later) is correct for your local repository. In other words, when you go to a repository, there should be two options in the "Clone or download" field:
[email protected]:<username>/<repository-name>.githttps://github.com/<username>/<repository-name>.git
To avoid typing in your password for every push/pull to and from the repo, you will need to use #1. If this does not make sense yet, just keep reading and come back to this section when it does.
Barebones Basics
If you already know the basic Git terms and how to commit, push, and pull, then you can skip down to the section named [A Simple, Effective Git Workflow](#A Simple, Effective Git Workflow). If you are completely new to Git, this section will teach you everything you need to know to successfully use Git.
- Source Code - this is a fancy term for "all the code that belongs to a project in its original state"
- Repository - A "repo" is another word for a bunch of source code.
- Branch - An essential concept of Git in general. Each repository can have multiple branches. Each branch can have unique source code.
- Remote - this word could mean a lot of things, but in the context of Git, it refers to the version of the repo that is sitting on a server somewhere (in most cases, it refers to the version of a repo which lives on Github's servers).
- Local - this word could also mean a lot of things. It refers to the version of the repo that is sitting directly in front of you on your physical machine. It is literally the code that is written to the disk on the computer sitting in front of you. One caveat to this is if you are running Git from a virtual machine. In that case, your repo is being stored on a remote virtual machine and a remote server, but this does not really matter. Just think of the "remote" as "Github" and "local" as "my computer".
- Commit - This will make more sense in a moment, but it is the action of "saving" your changes with a "receipt of save". This is different from saving a document to your computer because once you save that document, you cannot go back to the previous version before the save unless you had made another copy of the document. In Git, you can go back to the previous version of the save, which is referred to as "reverting to the previous commit".
- Push - Once you have "saved" (committed) at least one time, you can push those changes to your remote repo.
- Pull - This means that you are retrieving new changes from your remote repository and updating them in your local version of the repo. You will see why this is useful when we start talking about multi-contributor code projects.
- Clone - This means you are creating a "copy" of an entire repository. There can be an unlimited number of repo copies stored on an unlimited number of local machines that all push their changes up to the remote repo (i.e. Github).
- Origin - This refers to the HTTP URL or SSH identifier for a specific remote repository and is how we push/pull to and from our local/remote repos.
To better understand all of these terms, we are going to create a brand-new repository on Github. Be sure to refer to the definitions above throughout.
To do this, either sign in to your account or create a new account (it's free forever). Once you have created an account, click on the + icon in the top right corner of your screen and select "New repository". You will be taken to the following screen:
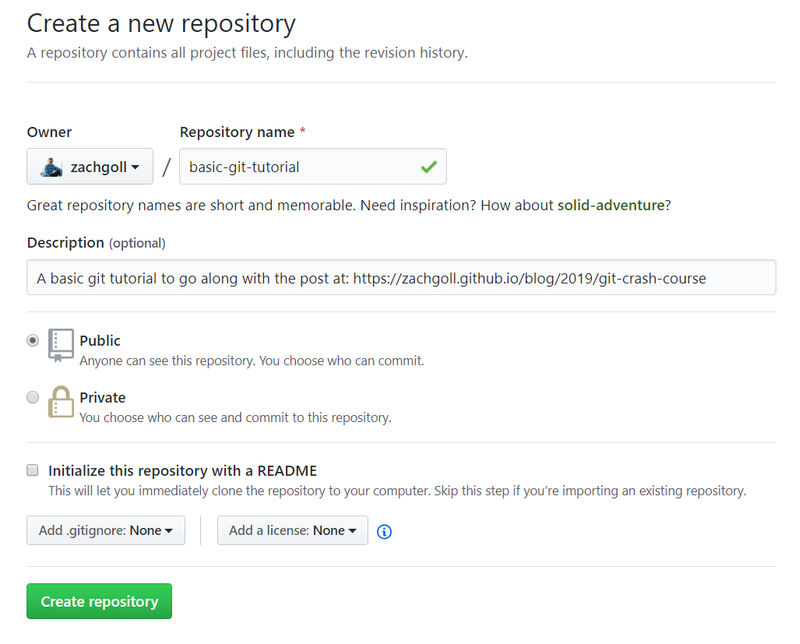
For the purposes of our tutorial, do not click the "Initialize this repository with a README". We will manually do this. Click "Create Repository". You will be taken to the setup screen.
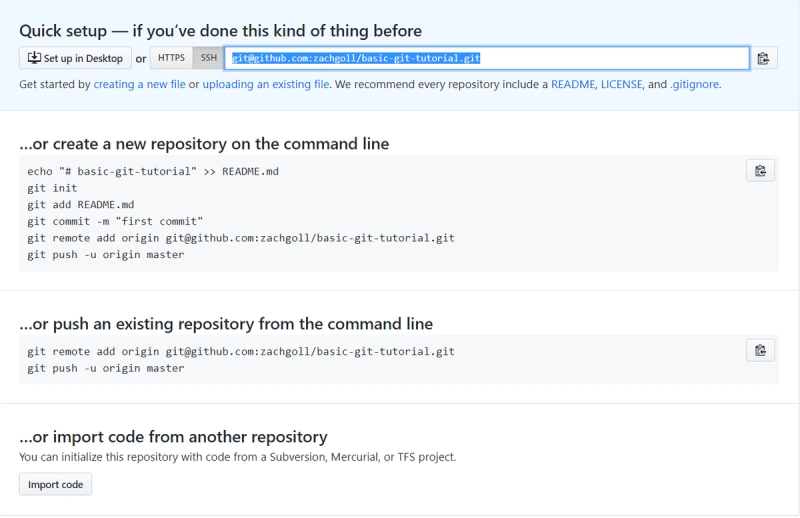
When you first create a repo, you are shown four different options for setting it up, but really, there are only two methods to setup your repo.
- Clone it
- Manually add the remote origin URL (or SSH in our case)
We will go through both processes. Remember, you can have multiple copies of a single remote repository. Open your terminal, navigate to whatever directory you want to put this example repository in, and type the following command (replacing the appropriate information). Make sure you select the SSH version of the link to take advantage of what we setup earlier in this tutorial:
git clone [email protected]:zachgoll/basic-git-tutorial.git
cd basic-git-tutorial
This will create a new folder on your computer called basic-git-tutorial. This folder has no files in it yet, but it does have a folder called .git which you can see by typing ls -la. This folder will keep track of all your commits, branches, etc. as we add them. Since we cloned the repo, the remote origin will already be setup, and we can check this by typing the following command.
git remote -v

# origin	[email protected]:zachgoll/basic-git-tutorial.git (fetch)
# origin	[email protected]:zachgoll/basic-git-tutorial.git (push)
You should see two URLs or SSH URLs which represent the path to your remote repo. We can also set this up manually with the second method.
# Create a new directory for your repo
mkdir git-tutorial-manual

# Enter the new directory
cd git-tutorial-manual

# Initialize your Git repository
git init

# Setup the remote origin
git remote add origin [email protected]:zachgoll/basic-git-tutorial.git
Following the above steps will get you to the same spot as after cloning the repository. You can confirm by running the git remote -v command and making sure you have this setup correctly. Now that we have the repository setup, we will create a couple folders and files to work with.
mkdir source-code
touch source-code/index.html
touch README.md
In the index.html file, put a simple HTML document.
<!-- index.html -->
<html>
  <head>
    <title>Basic Webpage</title>
  </head>
  <body>
    <h1>Hello World</h1>
  </body>
</html>
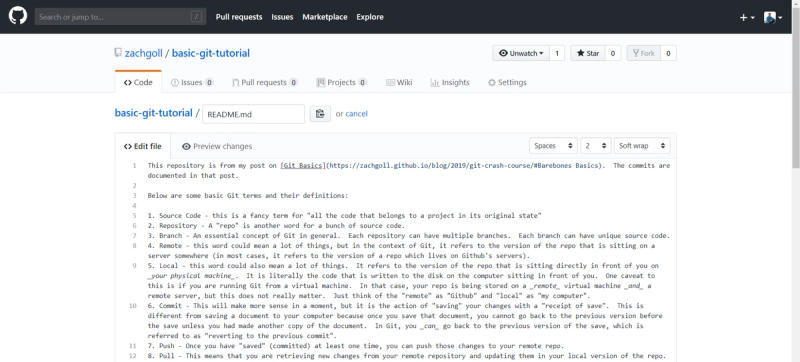
In the README.md, add any text you want. Now, we are going to "stage" these files for a commit. You can either add them individually, or all at once.
# Method 1: Add each file individually
git add source-code/index.html
git add README.md

# Method 2: Add all files in current directory
git add .
Now, run the following command:
git status
This should output the following:
On branch master

No commits yet

Changes to be committed:
  (use "git rm --cached <file>..." to unstage)

    new file:   README.md
    new file:   source-code/index.html
Now, we will "commit" the files. Once we commit the files, the current state of them will forever be stored in this Git repository.
git commit -m "Add files"
[master (root-commit) 7c076fa] Add files
 2 files changed, 10 insertions(+)
 create mode 100644 README.md
 create mode 100644 source-code/index.html
The last thing that we must do is push the committed changes "upstream" to the remote repository. We specify that we want to push the changes to the master branch (more on branching later).
git push origin master
Now let's say that you make some changes to your repository on Github (i.e. you are making changes to your remote repository, not your local repository). Below are screenshots of editing the README.md file and committing the changes.
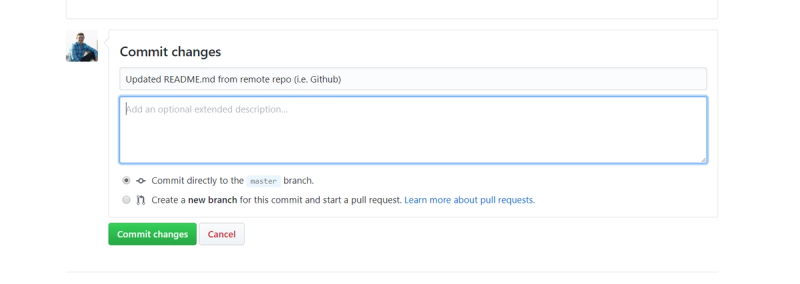
Once I make this commit, the remote repository (Github) is going to be ahead of my local repository. To avoid conflicts, before I do any more work on my local repository, I need to "pull down", or "push downstream" the changes.
git pull origin master
remote: Enumerating objects: 5, done.
remote: Counting objects: 100% (5/5), done.
remote: Compressing objects: 100% (3/3), done.
remote: Total 3 (delta 0), reused 0 (delta 0), pack-reused 0
Unpacking objects: 100% (3/3), done.
From github.com:zachgoll/basic-git-tutorial
 * branch            master     -> FETCH_HEAD
   29d0b59..91b8897  master     -> origin/master
Updating 29d0b59..91b8897
Fast-forward
 README.md | 15 ++++++++++++++-
 1 file changed, 14 insertions(+), 1 deletion(-)
The output of the git pull command shows that 1 file called README.md was change, and we made 14 line insertions and 1 line deletion. Now, our local and remote repos are perfectly synced up!
From here, you will continue to go through this process indefinitely.
- Make changes
- Stage changes (
git add) - Commit changes (
git commit) - Push changes (
git push) - Pull changes if necessary (
git pull) - Repeat
For a more advanced and realistic workflow, continue reading.
Github vs. Gitlab vs. Bitbucket vs. Local
I won't spend your precious time wasting away on this question, but thought it was necessary to clarify that Github, Gitlab, Bitbucket and others are simply "hosting" platforms for the Git source control tool. In other words, they run the computers that store your code remotely.
Git is an open-source software, so you could also set up your own Git host on an AWS, Azure, DigitalOcean, etc. server and it would work the same as with Github. If you are savvy enough, this is a great way to save some money when you need to build software with your team privately (most of these hosting services charge for private repos).
git checkout develop

# Do lots of work!